Front Axle Build

INTRODUCTION
The front axle design will be my first challenge. Since I have a 50″ wheel track, the axle will need to be a lot wider than what one can buy from Renegade or any others. I also wanted to to have the same shape as the real Pullman, so it had to be a custom build. I felt up to the task. I learned a lot about welding on my previous Bugatti project so I was eager to dip my toes into fabricating a complete axle including the spindles.
SPINDLES
For the spindles, I decided to copy the set I had on my Bugatti that I purchased from Renegade. This departs a bit from the appearance of the much larger size spindle design of the original Pullman car, but going with the Renegade design seemed more attainable. I examined and measured the various parts and then found sources that were identical or very similar. I found a lot of parts on McMaster-Carr, but boy was it expensive with shipping. Since I did not have a metal mill or lathe this was going to be particularly challenging.
Cutting the pipe for the barrels was done on my homebuilt metal bandsaw. I deliberately cut them slightly over-sized then used my 6″ disc sander with 60 grit stick-on paper to finalize the fit perfectly.
I also needed to bore out the spindle barrel to fit the bushings at each end, so I bought the right size drill bit (even more expensive). That turned out to be a complete disaster. I could not get the drill bit perfectly centered to the barrels. I think my drill machine tolerances were also not as tight as needed.
If it doesn’t work, go buy the right tool for the job. That’s my brain rationalizing the need for an expensive metal lathe. A Harbor Freight lathe starts at $750, ugh…that’s a tough one to rationalize. Investigating these and other mini-lathes taught me they don’t particularly handle steel parts very well. For that you need to step up to around $1300. Added to that, you need to buy a 4 way chuck, and a lot of other tools. And so it goes the snare that starts at $750 and keeps rising to $1500, then $2000, then $3000 and more. While were at it, we might as well spring for a lathe/mill combo so the range was now $5000 and even higher. Where am I going to house this beastly machine that I don’t know how to use? My garage shop is already busting at the seems, but certainly I can find the space and money to fill it. I must, I must…
Remarkably, common sense prevailed and . I took the parts to a local machine shop where one day and $25 later I had two barrels with bushings in their place. Driving home from the machine shop I felt immense satisfaction and pride knowing I’d overcome this machining obstacle and saved $4,775! (Yes, I have learned how to think female after nearly 50 years of marriage and watching endless chick-flicks). My wife should be so proud of me! But I can’t share my victory with my wife without also condemning myself by exposing the way I think, so this little victory will have to remain a secret.
AXLE BODY
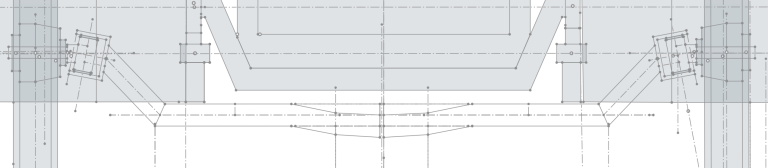
As you can see from the design drawing on the left, the axle requires several bends along the length to keep with the shape of the real Pullman. I don’t have a heavy-duty bender, so I elected to build it from 1.5″ x 1.5″ x 1.20 wall square tubing.
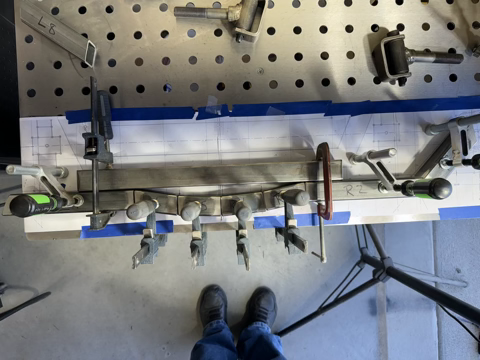
I printed my axle design to full length to use as a template. My initial plan was to make cuts at each bend along three of the tube’s sides, leaving one side intact for added structural integrity. I quickly discovered that was not going to work. To get precise angles, I needed to make separate parts. So I cut eight separate pieces. I was quite surprised how long it took to cut each one with a hand grinder equipped with a cut-off wheel, clean the edges, sand the edge precisely to match the template, grind all edges at a 45 degrees to optimize the weld penetration, and finally brush clean all the perimeter. I did not want to leave any stone unturned. The last thing I want or can afford is for the front axle to fall apart while I’m driving.
Once all 8 pieces were ready, my new Harbor Freight welding table came in handy for clamping each piece precisely to the template in preparation for welding. My table was not long enough to accommodate the entire length, so I had to do 2/3 then shift everything for the remaining 1/3.
One thing I learned the hard way while welding my Bugatti frame was managing heat. If you don’t clamp your object down to a flat base and then spread out your welds so your not just focusing on one area for an extended time, you’ll get warping. I also patiently waited far more than ever before to wait for parts to cool down naturally before flipping to another side. So I used a lot of clamps, welded one segment, then shifted to the opposite side of the axle, switching sides while also allowing for cooling off. It took a lot longer this way and required a lot more discipline than I had when I built my Bugatti. I guess that’s what I love about this sport is all that we get to learn even if its by our mistakes.
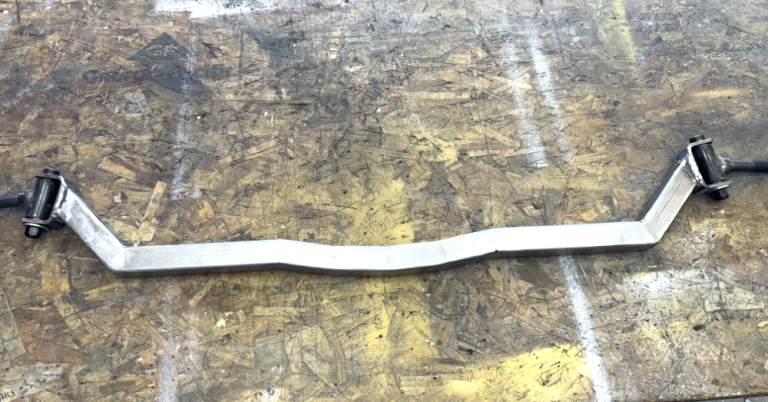
Fortunately, all my preparations and patience paid off. The axle was perfectly straight with no twist or warpage. I felt immensely proud of my achievement.
Once the axle was welded, I ground down the welds and then hit the entire assembly with a flap disk. It sure looked good, but it is still not finished. I still needed to weld on the spindle brackets.
WELDING THE SPINDLE BRACKETS
Now for the hard part. It was imperative that the spindle axles were perfectly aligned and that I got about 5 degrees of caster offset. After a lot of tinkering, I used a long length of my spare 1-1/2 square tubing for a straight edge that spanned the length of the axle assembly to perfectly line up the two spindle axles. Then I jury-rigged the brackets to a 5 degree angle for the castor. While it was easy to write these few sentences, I fiddled around a good hour and maybe more coming up with the rigging. This time I just used my portable wooden workbench then once everything was ready moved the bench to my welder station and attached the ground to the axle assembly. The welding took about 30 minutes, again exercising patience to allow for cooling. Then I cleaned it up and walla, it was done.
FINAL THOUGHTS
Building your axle can be a real-time sink. In my opinion, buying a completed assembly from the likes of Renegade is worth every penny. But if you need to go the custom route, have lots of time on your hands, and really want to challenge yourself, then building your own axle may be the only way to go. I could have just gone with a straight pipe axle like I see on all the equivalent Ford cars of that period, but that would have been cheating and not remaining true to the inspiration car. So even though it was a lot of work, I am so glad I went this route on this project. The only question now is will it hold up? Was my welding good and penetrating? To both questions I feel quite confident all will be well.