Type 13 - Design
This design will closely follow the Stevenson parameters and popular structural builds we typically see. After a lot of consternation about building an advanced all-carbon fiber Bugatti, common sense demanded I utilize standard metal construction. This would be more authentic and enable me to learn more about this type of construction.
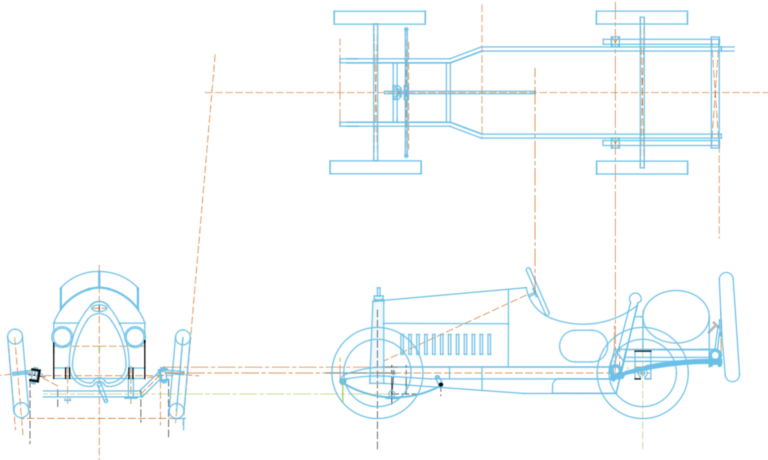
So I’ll be using the standard 3″ x 1″ rectangular steel tubing to build the chassis. To make it more interesting (and authentic) the front part will be curved shaped and ending with a weldment of 3/4″ pipe to capture the leaf spring. The frame will jog up by several inches around the seat back position and then extend back to a 2″ tube where the rear axle springs are supported. In my build, the rear springs will be for show only, there will not actually be any suspension going on. The fake springs will be built either from thin wood or fiberglass layups.
I initially thought I would build my own front axle, but after much thought I decided to simply go with Renegade’s design. While it does not provide a 5 degree positive camber matching the original car, the proven design, and durability of the Renegade axle will better ensure a safer and better ride. Maybe I’ll switch to my own design down the road when my design and welding skills improve.
One of the biggest challenges when designing a cyclekart using a digital CAD tool is obtaining correct dimensions of the parts. All too often, you simply have to have the actual parts in hand to model a lot of it because dimensional details are not readily available by the supplier on the internet. A good example is the Renegade spindle assembly. Why would they ever put all the dimensions on the internet unless they wanted to make it easy for competitors? And so it goes for many other parts and pieces as well. So I have had to gather a lot of these parts and then build them into my CAD design.
I initially planned on constructing the body tub using traditional aluminum panels riveted together and screwed into the chassis frame. I am; however, contemplating either fiberglass or carbon fiber to reduce the overall weight and give it a more curvy look emulating the tranny and other mechanicals sticking out the bottom of the chassis.
The body frame will be built using 1/2″ rectangular tubing bent to shape to support the body panels made from .040 inch thick aluminum. I’ve not found a local supplier for aluminum sheets and having it shipped here is incredibly expensive. So far, I’ve had to trailer it myself from Salt Lake City, Utah where the cost is nearly half of sourcing it here locally.
The front-mounted radiator, which is Bugatti’s signature piece, appears to be made of brass. I cannot afford to use brass, so I experimented with a particular metallic gold paint. The finish is indistinguishable from a real brass piece so I will definitely use this paint. I have not yet decided whether to build the radiator out of metal or fiberglass; I’m leaning towards fiberglass for now.
The rear gas tank will actually be a cover for the motor. I intend to make it look like it’s also made out of brass. I plan on making the top part of the tank hinge open to facilitate access to the motor and real gas tank. I’m also thinking with a few screws, the entire cover will be removable to give full access to the entire rear part of the car.
The gears I plan on using are the 10 tooth driver and the 60 tooth driven gears with a 41 pitch chain for added robustness. I also plan on using the Peerless differential.
If time permits I will also build my own steering wheel from steel and wood. There are many good YouTube videos on the subject.
I purchased a standard Predator 212 motor from Harbor Freight. I will implement the stage one mods to hop up the rpm and horsepower. I will eventually also use an upgraded carburetor with a larger throat.
I have already designed a radiator hood ornament with the help of my son who is a wiz using Blender. We recreated the design from actual photos and I must say, it turned out spectacular and amazing once I sprayed it with the gold metallic paint. You can even see the detailed inscriptions we built into the design to match those in the real caps.
3D printing is pretty amazing stuff and I expect to use it in other places on that car. Items to be 3d printed include the Bugatti badge mounted to the front of the radiator, the radiator cap, instrument bezels, parts of the fake rear suspension, front headlamp covers, wheels spinners, and gas cap. I will most likely use ABS material to withstand high temperatures. Other materials have higher temperature specifications; however, their difficulty to print outweigh the little higher temperature specifications, so I am going to stick with ABS which is challenging enough to print for me.
A spare wheel will hang off the rear end. I will make it extremely easy to remove for racing to lower the weight.
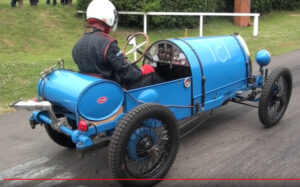
At this point in time I plan on painting it a pretty blue per the inspiration car with a rich brown leather interior. I really like this look. Alternately, I might go with a patina green and bare aluminum color scheme in keeping with the spirit of the early 1920-1930 period.