

Learning the English Wheel
Oh how much I have admired the metal artisans who could bend, shape, and mold metal into beautiful works of art! As I watch the YouTube experts shape metal on their English wheels, they make it look so easy! But I know differently.
I had hoped to avoid buying one for several reasons including, taking up valuable space in my shop for something I would rarely use, the cost, and finally the facing a difficult learning curve.
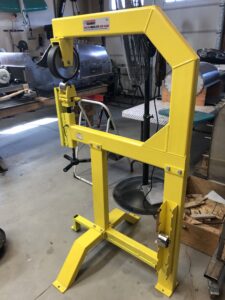
But while working on the body panels, I recognized there was no way I was going to accomplish this without one, so off to Harbor Freight once again! Without any sales or Harbor Freight dollars in my wallet, I ended up paying the full price, ouch $380. Fortunately, two strong guys loaded it up in my small trailer for me; this thing was very heavy!
Once home, I unpacked one piece at a time from the trailer, so it wasn’t too difficult to unload. The assembly went remarkably fast too so I was pleased in those respects.
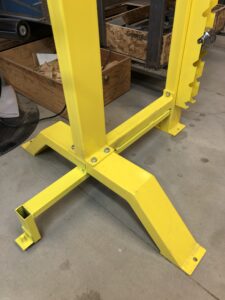
In my YouTube research, I learned that the current Harbor Freight design is nose heavy at the wheels and wants to tip over. The solution is to add a section of tubing with a floor-level adjustment. Fortunately, I had enough scrap 2″ rectangular tubing and a leveler on hand so it was easy enough to weld up a lateral extension giving the English Wheel an added foot. Some YouTubers also added wheels to the feet to permit easy transport within the shop. While it appealed to me, I decided to forgo the added wheel transportability. It was easy enough to scootch the English Wheel across my cement floor, even though it protested by making terrible scratching noises. I initially used C-clamps to hold the extension to the original frame but later welded it on as I needed my clamps back.
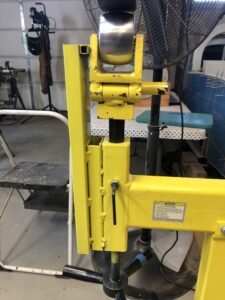
The next thing I discovered on my own as I had never heard anyone else complain was how the bottom anvil wheel would wobble left and right. The instructions tell you to adjust a screw, but I found by time you adjusted it to stop the wobbling, you also locked it to where you could no longer adjust the anvil height.
I noticed that one manufacturer of very fine English wheels had separate adjustments to ensure the upper and lower wheel were always aligned; something that would be impossible on my Harbor Freight model.
I also noticed Steve Vinson had added a zip tie to his to better secure it in one of his videos. He never made mention of it, but I presume the zip tie was to limit the wobbling. I tried this method without success. So after scratching my head for a while, I clamped some wood along the bottom anvil support so it could act as a stabilizer for the lower anvil in any position. By-golly, it seemed to work! But I was not going to be satisfied by a wood contraption, so off to my metal scrap pile for a length of 1/2″, 3″ and 2″ rectangular tubing. Once clamped on it proved too tight, so I added a 0.040 thick piece of aluminum to give it a little relief and it worked perfectly. After using it for a while, I decided to weld it all to the frame and for good measure painted my mod add-ons yellow.
The anvil guide works perfectly with one single exception, you have to be careful not to scrape your hand across the top edge of the exposed metal tubing. I plan on 3D printing a top-edge piece so my hands will be protected. For the most part, the bare metal top edge of the tubing wasn’t a significant problem, but better safe than sorry.
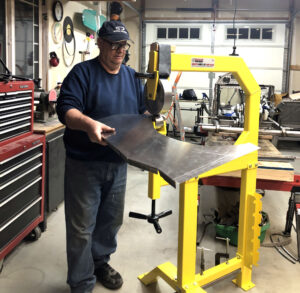
My initial English Wheeling endeavors were miserable failures despite my many hours of watching YouTube experts. There is definitely some art applied in addition to techniques. Had I enough extra metal and time, the learning curve would have been very pleasurable, I’m sure. But I had neither extra aluminum nor much time so the added pressure was a bit of a hurdle.
The Harbor Freight English Wheel is only supplied with one 3.5″ anvil. I found this curvature a bit excessive initially so I investigated purchasing a full set for added flexibility. Unfortunately, the only affordable set was not deliverable for a few more months, so that option was out. I ended up buying an 8″ anvil which worked well for me. If I had this 8″ anvil earlier, I think some of my frustration may have been avoided. Between the two, I was able to get everything done that I needed. Thanks to the YouTube community for sharing so much; it made all the difference. But in the end, you don’t learn by just watching others but by doing it yourself.
If I did not have to travel over two hundred miles each way to purchase (more) affordable sheets of aluminum, I would have redone several panels, but it is what it is. I am OK with the final result. If I ever get to do it over again, I know I’ll be able to do a much better job, but money and time necessitate I move on.
Am I glad I bought and English Wheel? Yes, I am. Learning new skills can be a frustrating experience, but if you are persistent and patient, you can overcome it. I am very distant from being an expert, but I enjoy bending metal like never before. Tools give you power, and I am most certainly a tool junkie without any foreseeable cure.
